
Better Time Tracking for Jira Using Shoutbase & Zapier

I’m a software engineer, but I spend so much time each day performing tasks that aren’t writing software. Some of those tasks I enjoy, such as my morning ritual of sipping coffee and defining my goals for the day. Others I don’t love as much, such as the end of the week scramble to find all the Jira issues I worked on and manually entering my time for each issue. It’s 50% guessing game, 50% frustrating, and 100% necessary to make sure billing and everything else on the business-side of writing software goes smoothly. That’s how it used to be.
Thanks to tools like Zapier, it’s easy to create processes to minimize the time spent doing chores I don’t enjoy. In minutes, I was able to create a “Zap” that allows me to automate the most frustrating part of my day—keeping track of how much time was spent on each Jira issue. Now, I’m able to use Shoutbase, a tool that fits in better with my workflow for tracking time than Jira (the system where I must log the time).
This step-by-step guide will show you how to create a Zap that integrates Jira and Shoutbase for better time tracking. At the end of this guide, you will be able to link Jira issues to Shoutbase time entries. When a new time entry is stopped in Shoutbase, the Jira issue will be updated with a comment including the description of the time entry and the duration*.
Getting Started
Before creating this integration, make sure you have the following accounts set up and a basic understanding of the systems we’ll be working with. In case you’re new to one or more of the technologies listed, I’ll include information about getting started with each.
Shoutbase
Shoutbase is a time tracking system built for speed and simplicity. It’s optimized for fast data entry that lets you record time quickly, so you can get back to what you’re doing with minimal disruption. Shoutbase is free for individual users, and setting up an account is a breeze.
Jira Software
Jira is a popular work management tool used by software and product teams. Jira supports a wide range of use cases, such as bug and issue tracking, managing requirements and test cases, and time tracking. If you’re brand new to Jira Software, you can start a free trial.
Zapier
Zapier is a tool that helps you integrate the different web applications you use, allowing you to save time and energy. Zapier also includes a free trial and a free tier. If you are brand new to Zapier, check out their Getting Started Guide to gain a basic understanding of using Zapier and creating “Zaps” before continuing with this tutorial.
Technical Design
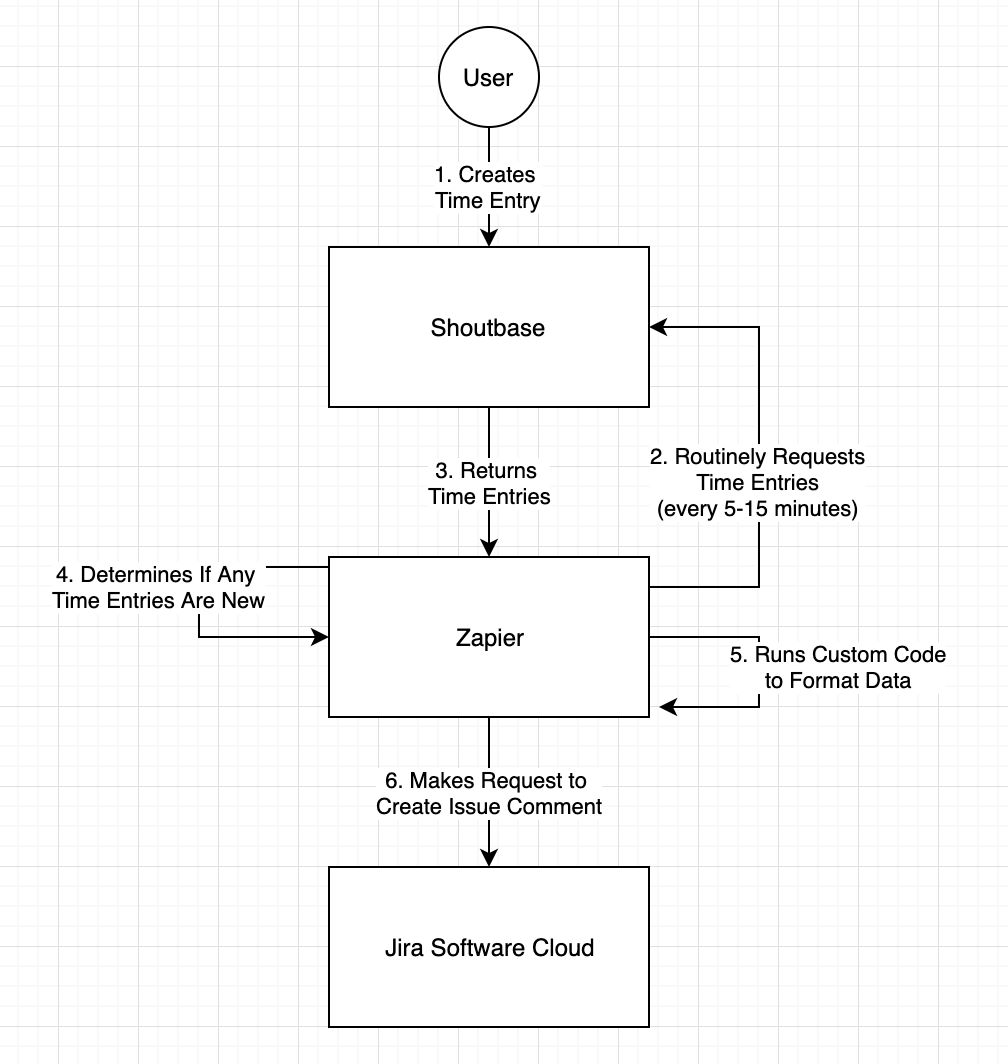
Before jumping into creating the Zap, here is a brief technical design of how our Zap will work.
- User creates time entry in Shoutbase. This is our “Trigger,” which means this event will cause Zapier to run the processes we define in our Zap.
- Zapier polls Shoutbase for new time entries by the user. Every 5-15 minutes, Zapier will make another request to Shoutbase to fetch entries.
- Shoutbase responds with a set of time entries.
- From the time entries response, Zapier determines if there are any new time entries since the last time it made a request. If there are no new time entries, nothing happens, and Zapier resets to make the request again in 5-15 minutes. If there is a new time entry, Zapier continues to the next step.
- When a new time entry is found, Zapier runs custom javascript code that we will define to format data from the time entry into something Jira can use to create a comment.
- Once the code is finished running, Zapier uses the data from the previous step to call the Jira API to insert a comment.
The following uml diagram illustrates how information is requested, transformed, and passed through the integration system.
Create a Zap
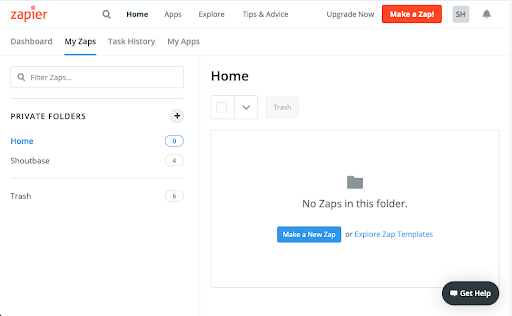
Log into your Zapier account. Once logged in, click “My Zaps.” Here you will see your Zap dashboard. This is where you can see and control the Zaps you’ve created in the past or create a new Zap. Click the “Make a Zap!” button.
Trigger Definition
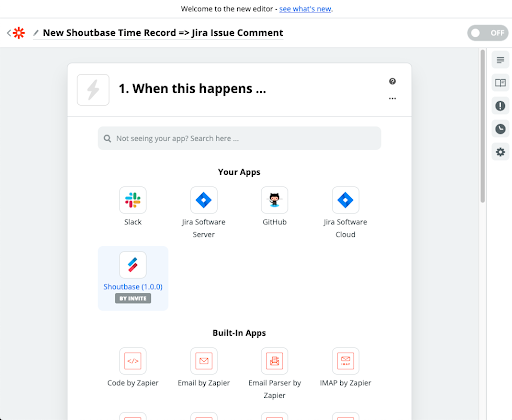
The first step to creating a Zap is defining your trigger. A trigger is an action that occurs in one system that causes something to happen in another system. In our case, “Shoutbase New Time Entry” will be the trigger.
1. Name Your Zap
I like to name Zaps very explicitly, so I can easily know what my triggers and actions are just by reading the name. In this case I’m naming my Zap “New Shoutbase Time Record => Jira Issue Comment.” You can use this or choose something different.
2. Choose Triggering App: Shoutbase
The Shoutbase Zapier integration is new and currently in beta. You’ll have to use this invitation link to select Shoutbase as your triggering app. In the future, you’ll be able to select Shoutbase from the list link other applications. Click the link below or copy and paste it into your browser.
https://zapier.com/developer/public-invite/31432/fa70581019fd453aed7317c47eb43d99/
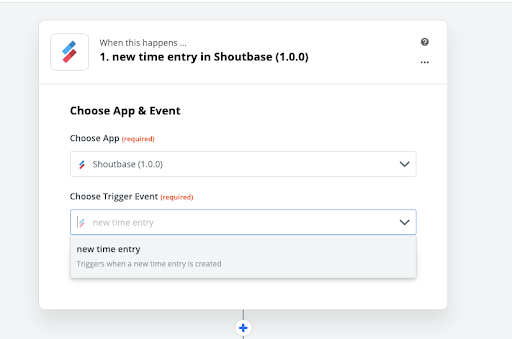
3. Select Trigger Event: New Time Entry
From the dropdown menu, select “New Time Entry.” This is a polling trigger event, which means the Zapier API will make regular requests (every 5-15 minutes) to check if there are any new time entries for your Shoutbase account. When there are, it will continue to the next step.
4. Connect Your Account
Continue to connect your Shoutbase account. A window will appear requesting access to your Shoutbase account. Authorize Zapier to connect to your Shoutbase account by clicking the “Allow” button. If you do not have a Shoutbase account yet, go to shoutbase.com to register and verify your account.
5. Finish Trigger
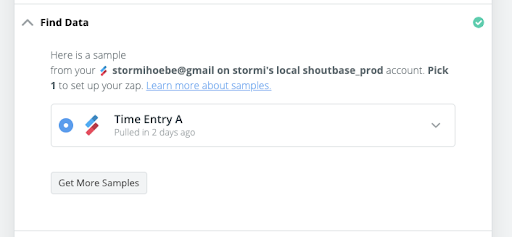
In the “Customize Time Entry” section, skip this for now by clicking “Continue.” Next is the “Find Data” section. Here, Zapier will poll the Shoutbase API for recent time entries (within the last 30 minutes) to give you an idea of the data you’ll be working with for the rest of the Zap.
If you are new to Shoutbase and haven’t created a time entry yet, now is a great time. Log in to your Shoutbase account, and create and save a time entry that includes a link to a Jira issue in the description, as well as a start and stop time.
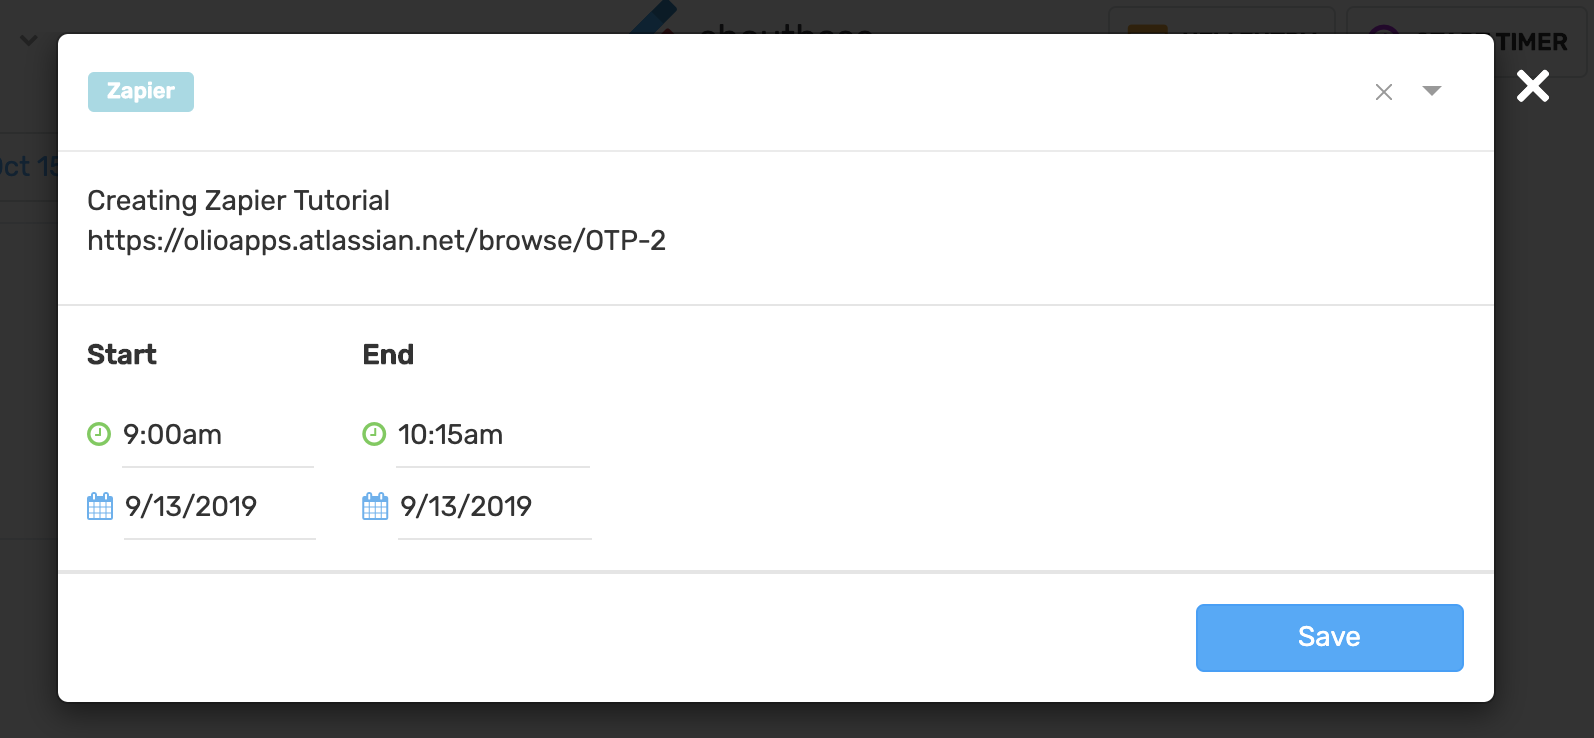
Once you’ve created this time entry in Shoutbase, go back to Zapier. Click the “Test & Continue” button. This will poll for new time entries. Select the time entry you just created, and that’s it for the trigger!
Format Data
Next, we need to format the data from our trigger into something our action can use. In this case, we want to capture the Jira issue ID and parse the duration from the time record.
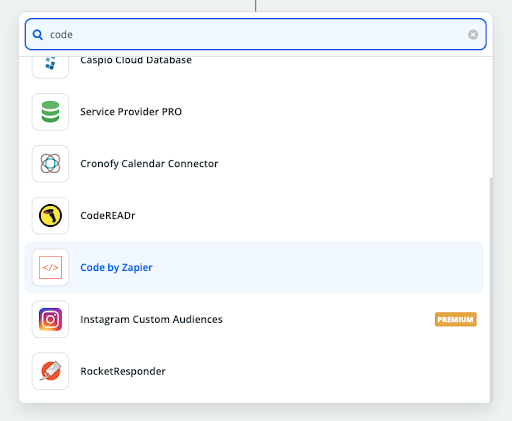
1. Code by Zapier
From the menu, select “Code by Zapier” and choose “Run Javascript” as your event.
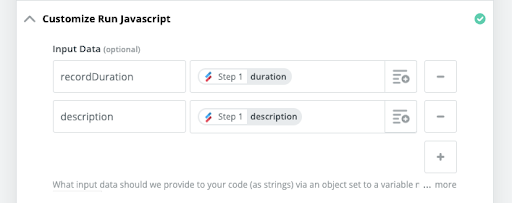
2. Input Data
Add the data from the previous steps that we will use in our custom code. Add the duration and description from Step 1 (time record).
3. Code
Add javascript for formatting duration and extracting the Jira ticket key. In the following example, I split the description by a string found in Jira issue URLs and extract the string immediately following .atlassian.net/browse/. That is the Jira issue key. You can write fancier code that can accommodate multiple Jira issue URLs. For me, that’s not necessary.
I also have some generic code that formats the time record duration from seconds into hours, minutes, and seconds, so it’s easier for me to read later.
Copy the code below hosted by Pastebin.
4. Finish Code
Test your code and continue. If you get an error when running your test, double check that the time record you selected as “Test Data” in Step 1 includes a Jira issue URL. If it does not include a URL, go back to Step 1 -> Find Data, and find and select an item that does include a Jira issue URL. Then rerun your test.
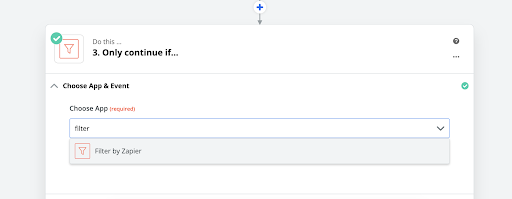
Filter Definition
If the time record does not contain a Jira key, we will want Zapier to filter out this time record and not continue on with the rest of this Zap. Therefore, we need to add a Filter step.
1. Choose App and Event
Select “Filter by Zapier” from the App dropdown menu.
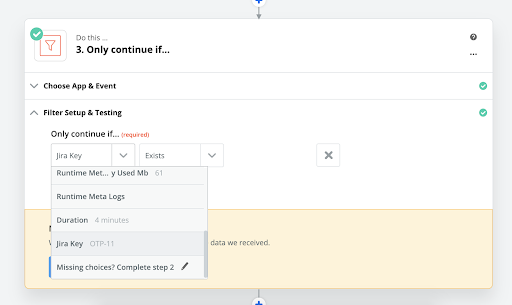
2. Define Filter
In the “Continue only if…” options, select “Jira Key” nested under “Run Javascript,” then choose “Exists.” If the Jira Key doesn’t exist or is null, the Zap will discontinue at this point. If there is a Jira Key, the Zap will continue to the Action step.
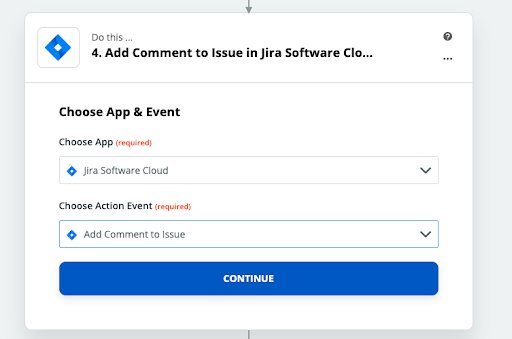
Action Definition
1. Add Jira Action
Select “Jira Software Cloud” as App and “Add Comment to Issue” as Action Event. Connect your Jira Software account in the authorization popup window.
2. Select Jira Issue
Comments will be dynamically added to issues depending on the URL pasted in the Shoutbase time record. Therefore, in the dropdown menu, select the option “Use a Custom Value (advanced).”
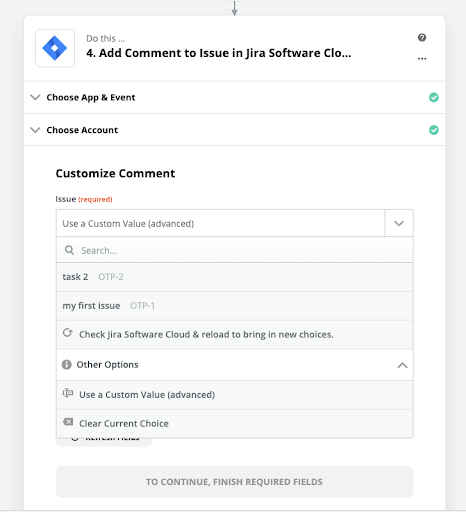
In the “Custom Value” for “Issue” key field, click the dropdown menu. Click to expand “2. Run Javascript.” Select “Jira Key.” This is capturing the jiraKey parameter we defined as output in our custom Javascript.

3. Add Comment
Here you can customize the comment to suit your needs. I like to include the entire description from my Shoutbase time entry, as well as the duration we formatted in Step 2. This way, I can read the comment, get a full context of what I was working on, and see how long I worked, all in a readable format.
4. Finish Up
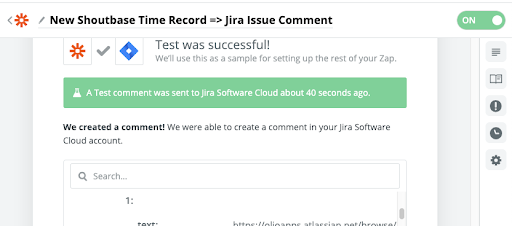
After entering your comment, click the “Continue” button. Run your test. After receiving a success message in Zapier, check your Jira issue. You should see a comment appear. Finally, don’t forget to turn on your Zap. This is done by toggling the grey switch at the top of the screen to “On.” When your Zap is on, Zapier will continuously poll your Shoutbase account for new time records. If it’s off, the Zap won’t work.
See Your Zap in Action
1. Enter Time in Shoutbase
Now that your Zap has been created and activated, let’s see it in action. Log in to Shoutbase and select “New Entry” from the nav menu. (If you’re using mobile Shoutbase, you can click the blue plus button at the bottom of the screen.) Add a Jira issue URL to the time entry description, along with any other details. Add a start and stop time. Zapier only polls the Shoutbase API for stopped timers, so if you don’t include an end time to the time entry, Zapier will not recognize it until it is stopped.
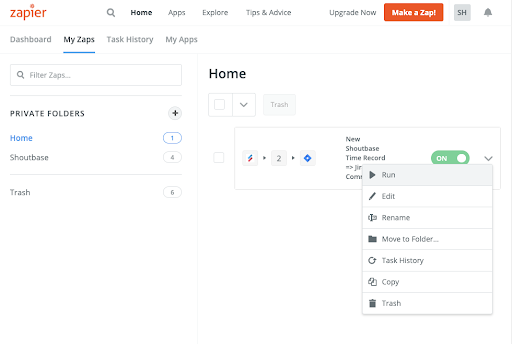
2. Manually Run Your Zap in Zapier
Zapier polls the Shoutbase API for new time entries every 5-15 minutes, so you won’t instantaneously see your new time record appear as a comment in Jira. However, you can manually trigger Zapier to run your Zap and check for new time entries instantly. To do this, go to your Zaps dashboard in Zapier, find your Shoutbase/Jira Zap, click the dropdown menu, and click “Run.”
3. Jira Comments
Log in to your Jira Software account, open the issue linked in the time entry description, and see the new comment. Rejoice that you will no longer have to struggle to remember which tickets you worked on, or guess how long you worked on each one at the end of the week!

Conclusion
This simple Zap took only minutes to put together and saves me so much time and mental anguish. And it’s only the beginning. The possibilities for integration and optimization are endless. Zapier lets me expand the capabilities of web applications I prefer interfacing with and minimize tedious tasks in other applications.
I enjoy tracking time in Shoutbase because it’s fast and easy to use and conveniently manages the time for my entire team with tags, goals, and reports. Plus, Shoutbase is actively expanding its capabilities to integrate with other systems like Jira, Github, and Slack, all by using Zapier.
If you’re interested in learning more, check out my other articles about why and how integrations can make us all better at doing what we do.
Time Tracking GitHub PRs Using Shoutbase & Zapier
Dynamic Duos: Integrating Jira & Shoutbase Using Zapier
Automated Time Tracking and Billing Integration with Shoutbase & Quickbooks
*Note: I would LOVE to use Zapier to directly input time into Jira issues, rather than adding a comment and having to go back and input the time from my comments. I’ve submitted a request to add this feature to the Jira Software integration on Zapier, and I’m patiently waiting. But for now, this method works for me.
What did we miss?
Please let us know by tweeting to @shoutbase on Twitter.
Stormi Hoebelheinrich
Developer of Shoutbase and Olio Apps.
LinkedIn: @shoebelheinrich
Thanks for reading!
If you would like to learn more about Shoutbase, please follow us on Twitter, Instagram, Facebook, LinkedIn, or Medium!